

Tired floors lacking durability and visual appeal plague many Queensland homes and commercial properties. Proper surface preparation increases epoxy adhesion and longevity, transforming worn concrete into stunning, resilient surfaces. Decorative epoxy coatings offer an accessible solution when applied correctly, combining aesthetic enhancement with long-lasting performance. This comprehensive guide walks you through detailed application instructions tailored for Queensland conditions, equipping homeowners and property managers with the knowledge to achieve professional-quality results. Whether upgrading a garage, patio, or commercial showroom, mastering these techniques ensures your decorative epoxy floor delivers beauty and durability for years.
Table of Contents
- Key takeaways
- Preparation: what you need and how to get ready
- Step-by-step application instructions
- Troubleshooting common mistakes and how to avoid them
- Expected results and maintenance tips for decorative epoxy floors
- Discover professional epoxy floor coating solutions
- Frequently asked questions
Key Takeaways
| Point | Details |
|---|---|
| Surface prep matters | Begin with thorough cleaning, degreasing and grinding or etching to create a mechanical bond for the epoxy. |
| Moisture testing critical | Tape a plastic sheet to the floor overnight and check for condensation underneath, addressing any moisture issues before coating. |
| Quality materials essential | Select quality epoxy, primer and topcoat matched to the decorative finish and Queensland conditions for lasting performance. |
| Curing time matters | Respect the manufacturer cure times and temperature guidelines to prevent premature failures. |
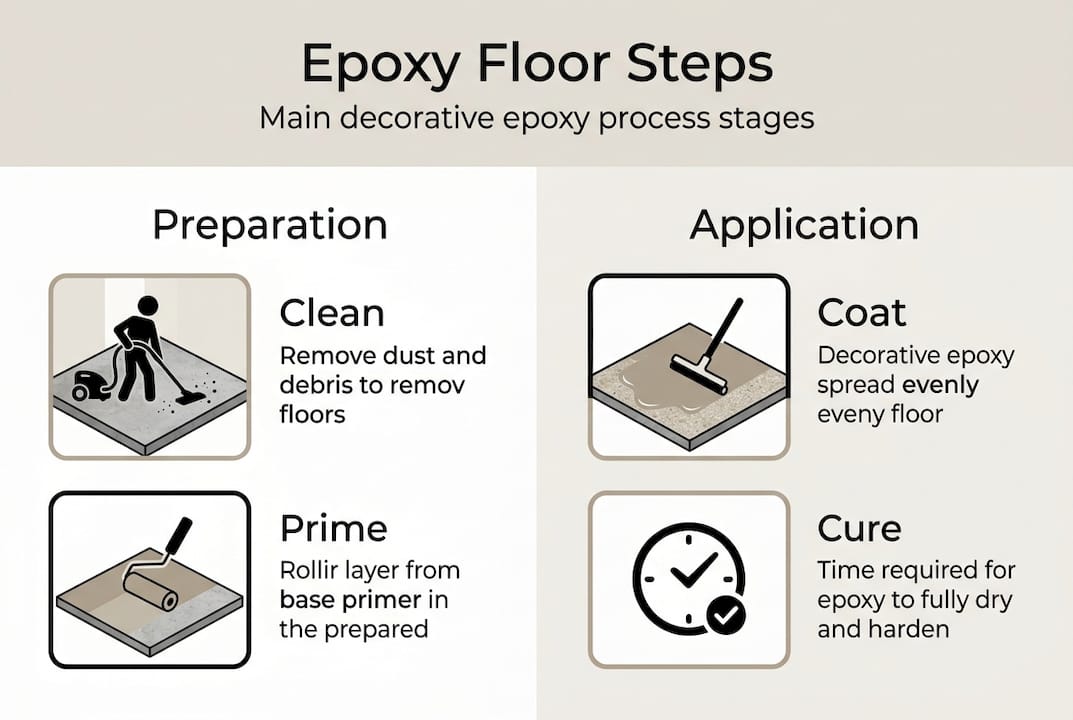
Preparation: what you need and how to get ready
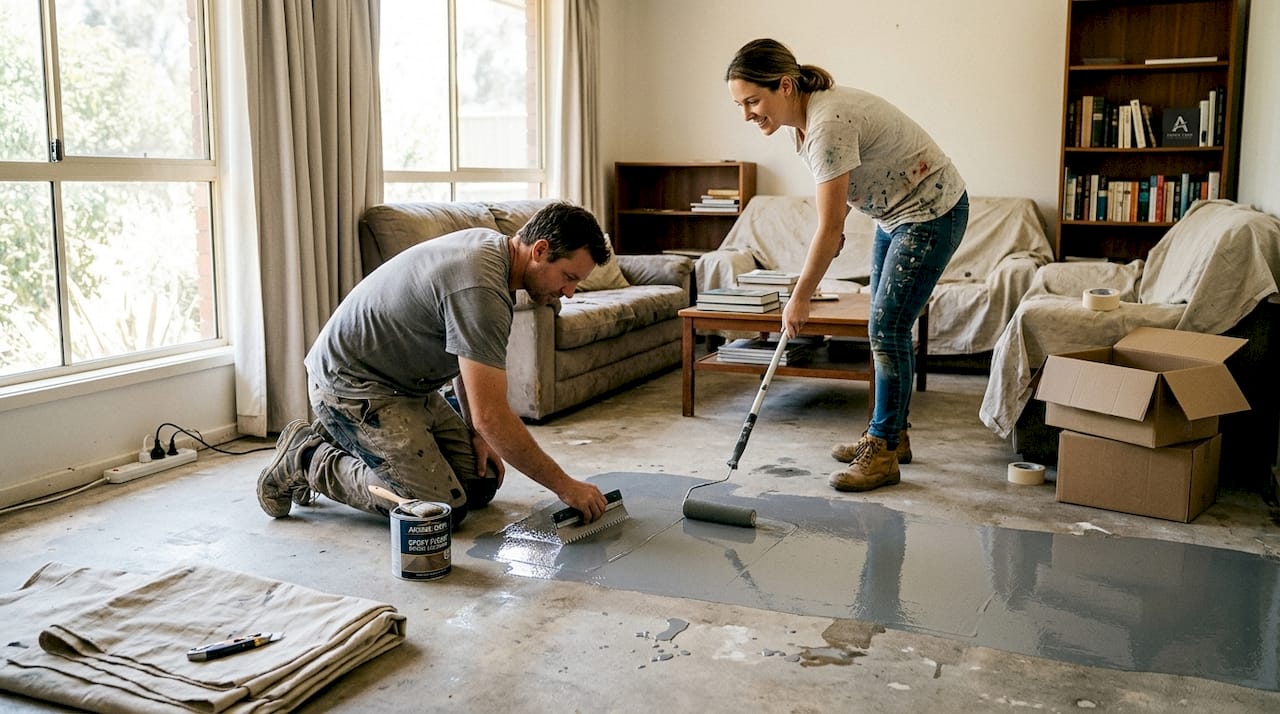
Successful decorative epoxy application begins long before you open the first tin. Surface preparation determines whether your floor lasts decades or fails within months. Start by removing all furniture, equipment, and debris from the work area. Sweep thoroughly, then use a degreasing cleaner to eliminate oil, grease, and stubborn contaminants that prevent epoxy adhesion. For heavily soiled concrete, consider hiring a mechanical grinder or shot blaster to expose fresh aggregate and create the rough profile epoxy needs to grip.
Moisture testing prevents catastrophic failures. Tape a plastic sheet to the floor overnight and check for condensation underneath. Queensland’s humid climate makes this step critical, especially for ground-level slabs without moisture barriers. If moisture appears, address drainage issues or apply a moisture-mitigating primer before proceeding. Inspect the entire surface for cracks, spalling, or structural damage. Fill cracks wider than hairline with epoxy crack filler or polyurethane sealant, allowing full cure before coating.
Gather your materials and tools before starting. You’ll need epoxy resin and hardener matched to your decorative finish, compatible primer, mixing containers, graduated measuring cups, notched squeegee or roller, spike roller for releasing air bubbles, decorative flakes or metallics if desired, topcoat sealer, and safety equipment. Quality epoxy floor coatings perform better and last longer than budget alternatives, making material selection crucial.
Essential preparation checklist:
- Clean floor with degreaser and rinse thoroughly
- Grind or etch surface to create mechanical bond profile
- Test for moisture and address any issues found
- Repair all cracks and damage with appropriate fillers
- Protect walls, fixtures, and adjacent areas with tape and plastic
- Ensure workspace temperature stays between 10-30°C during application
- Verify adequate ventilation with fans or open doors
- Gather all tools and materials within easy reach
| Tool/Material | Purpose | Specification |
|---|---|---|
| Epoxy primer | Seals concrete and improves adhesion | Two-part, moisture-tolerant formulation |
| Base epoxy | Main coating layer | 100% solids, self-levelling type |
| Decorative elements | Aesthetic enhancement | Vinyl flakes, metallic pigments, or quartz |
| Topcoat sealer | Protection and gloss | UV-stable polyurethane or epoxy clear coat |
| Spike roller | Removes trapped air | 25-50mm spikes for self-levelling coatings |
| PPE | Personal protection | Chemical-resistant gloves, respirator, safety glasses |
Pro Tip: Apply primer in late afternoon so it can cure overnight, letting you start the main coat early next morning when temperatures are cooler and you have maximum working time before heat accelerates epoxy cure.
Workspace setup matters as much as surface prep. Block off the area to prevent foot traffic during application and curing. Position fans to create gentle air movement without blowing dust onto wet epoxy. Lay out drop cloths and have cleaning solvents ready for immediate spill cleanup. Choosing epoxy coatings for Queensland floors requires understanding local environmental factors that affect application and performance.
Step-by-step application instructions
With preparation complete, you’re ready to transform your floor. Timing and technique separate professional results from disappointing failures. Begin by mixing your primer according to manufacturer specifications. Pour the entire hardener container into the resin base and stir thoroughly for 3-4 minutes, scraping sides and bottom to incorporate all material. Never mix partial batches, as incorrect ratios compromise cure and performance.
Apply primer using a roller or brush, working in sections to maintain a wet edge. Coverage rates typically range from 4-6 square metres per litre, but porous concrete may require more. Allow primer to cure per product instructions, usually 4-8 hours, before proceeding. The surface should feel dry but slightly tacky, providing optimal mechanical and chemical bond for the base coat.
Decorative epoxy application sequence:
- Mix base epoxy by combining resin and hardener in correct ratio, stirring for 3-5 minutes until uniform colour appears
- Pour mixed epoxy in ribbons across the floor, starting at the far corner from the exit
- Spread evenly using notched squeegee or roller, maintaining consistent thickness of 2-3mm
- Work quickly as pot life typically ranges 20-40 minutes depending on temperature
- Immediately roll with spike roller to release trapped air bubbles and smooth surface
- Broadcast decorative flakes while epoxy remains wet, applying to desired coverage density
- Allow base coat to cure 12-24 hours until firm enough to walk on carefully
- Scrape excess flakes and vacuum thoroughly before topcoat application
- Mix and apply clear topcoat sealer using same technique as base coat
- Roll topcoat with spike roller to ensure uniform thickness and bubble-free finish
Pro Tip: Keep a wet edge by working with a partner who spreads while you roll and de-air behind them, preventing visible lap marks where slow-curing epoxy meets fresh material.
Following a precise multi-step application process yields durable, visually appealing floors that resist wear and enhance property value. Temperature control proves critical throughout application. Epoxy cures faster in warm conditions, reducing working time but accelerating project completion. Cold temperatures extend pot life but slow cure, potentially causing surface defects if humidity rises before the coating hardens.
| Application stage | Typical duration | Temperature impact | Key consideration |
|---|---|---|---|
| Primer application | 30-60 minutes | Faster cure in heat | Maintain wet edge, work systematically |
| Primer cure | 4-8 hours | Extends in cold | Test tackiness before proceeding |
| Base coat mixing | 3-5 minutes | No significant impact | Thorough mixing prevents soft spots |
| Base coat application | 20-40 minutes | Pot life decreases in heat | Work quickly with helper if possible |
| Flake broadcast | During base application | Must apply while epoxy wet | Achieve desired coverage density |
| Base cure | 12-24 hours | Longer in cold/humid conditions | Avoid foot traffic until firm |
| Topcoat application | 30-60 minutes | Similar to base coat | Ensure complete flake removal first |
| Final cure | 24-72 hours light traffic | Full hardness takes up to 7 days | Restrict heavy loads during cure |
Calculate material quantities accurately to avoid running short mid-application or wasting expensive products. Measure your floor area precisely and add 10% for waste and uneven surfaces. Most epoxy systems provide coverage rates on technical data sheets, but porous concrete absorbs more material than dense, sealed surfaces. The DIY epoxy flooring guide offers detailed calculations and product recommendations for various project sizes.
Troubleshooting common mistakes and how to avoid them
Even experienced applicators encounter challenges with decorative epoxy. Recognising potential problems before they occur saves time, money, and frustration. The most frequent error involves incorrect mixing ratios. Measuring resin and hardener by volume rather than weight, or eyeballing proportions, creates soft spots that never fully cure. Always use graduated containers and follow manufacturer specifications exactly.
Surface contamination causes adhesion failures that appear days or weeks after application. Oil, grease, silicone, and curing compounds create invisible barriers preventing epoxy bond. Moisture trapped in concrete generates pressure that lifts coatings, creating bubbles or delamination. Queensland’s subtropical climate makes moisture-related failures particularly common, especially on ground-level slabs without vapour barriers.
Common application errors and prevention strategies:
- Insufficient mixing creates swirls, soft spots, and uneven cure; always stir thoroughly for full duration specified
- Applying epoxy over dusty surfaces prevents adhesion; vacuum and tack cloth immediately before coating
- Working in direct sunlight accelerates cure unpredictably; shade the area or work during cooler morning hours
- Inadequate ventilation concentrates fumes and slows cure; maintain air movement without creating dust
- Rushing between coats before proper cure causes delamination; test surface firmness before proceeding
- Using old or contaminated materials produces unpredictable results; check expiry dates and seal containers properly
- Ignoring temperature limits causes application failures; monitor conditions and postpone if outside recommended range
Common application mistakes include improper mixing ratios, inadequate surface prep, and environmental issues that compromise both appearance and durability of decorative coatings.
Bubbles and fisheyes indicate contamination or application technique problems. Trapped air rises as epoxy self-levels, but surface tension prevents bubbles from popping naturally. Spike rolling immediately after spreading releases most air, but contamination from silicone or oil creates persistent fisheyes that repel epoxy. If contamination appears during application, stop immediately and remove the affected material before it cures.
Uneven colour or gloss suggests inconsistent mixing, variable substrate porosity, or inadequate topcoat coverage. Some areas may absorb more epoxy than others, creating dull patches. Applying a uniform topcoat sealer usually resolves appearance issues, but severe problems may require light sanding and additional coats. Understanding epoxy versus polyurethane flooring helps you select the right topcoat for your specific durability and aesthetic requirements.
Temperature and humidity swings during cure cause surface defects ranging from blushing to poor gloss development. Applying epoxy when rain threatens or during extreme heat creates problems. Monitor weather forecasts and choose application windows with stable conditions for at least 48 hours. If unexpected weather arrives mid-project, protect the floor with temporary enclosures and maintain temperature control using heaters or fans.
Expected results and maintenance tips for decorative epoxy floors
Properly applied decorative epoxy creates a seamless, glossy surface that transforms ordinary concrete into an attractive, durable floor. Expect a finish that resists chemicals, abrasion, and moisture while providing easy cleaning and maintenance. The decorative flakes or metallics you incorporated add depth and visual interest, disguising minor imperfections and creating a custom look impossible to achieve with other flooring types.
Durability depends on application quality and ongoing care. Well-applied epoxy floors offer long-lasting durability and aesthetic enhancement requiring minimal maintenance, typically lasting 10-20 years in residential settings and 5-10 years in commercial environments with moderate traffic. Heavy industrial use may require recoating every 3-5 years, but proper maintenance extends service life significantly.
Maintenance practices for decorative epoxy longevity:
- Sweep or vacuum regularly to remove grit that causes microscopic scratches
- Mop weekly with pH-neutral cleaner diluted in warm water
- Wipe spills immediately to prevent staining, especially acids or solvents
- Place protective pads under furniture legs and heavy equipment
- Avoid dragging sharp or abrasive objects across the surface
- Inspect quarterly for chips, cracks, or wear patterns requiring attention
- Reapply topcoat every 2-3 years in high-traffic areas to maintain gloss and protection
- Keep floor dry and well-ventilated to prevent moisture accumulation underneath
Pro Tip: Apply a thin maintenance coat of topcoat sealer every 2-3 years to refresh appearance and extend floor life without the expense and disruption of complete recoating.
Cleaning technique matters as much as frequency. Avoid harsh chemicals, abrasive scrubbers, and steam cleaners that damage the epoxy surface or dull the finish. Soft microfibre mops and pH-neutral cleaners preserve gloss and prevent premature wear. For stubborn stains, use a soft brush with diluted cleaner rather than aggressive scrubbing.
Minor damage happens even with careful use. Small chips or scratches can be touched up with leftover epoxy, though colour matching proves challenging with decorative finishes. For significant damage, consult professionals about spot repairs or recoating affected areas. Catching problems early prevents water intrusion and substrate damage that require extensive remediation.
Environmental control extends floor life. While epoxy tolerates Queensland’s climate well, extreme temperature cycling and prolonged moisture exposure gradually degrade any coating. Ensure adequate drainage around exterior applications and maintain consistent indoor conditions where possible. The industrial epoxy floor coatings Queensland page offers additional insights into performance expectations for various environments and use cases.
Discover professional epoxy floor coating solutions
While DIY decorative epoxy application is achievable with proper preparation and technique, professional installation guarantees optimal results and saves considerable time. FloorX Industries specialises in transforming Queensland floors with expert epoxy floor coatings tailored to your specific needs and aesthetic preferences. Their experienced team handles every aspect from surface preparation through final sealing, ensuring flawless application and long-lasting performance.

Explore premium decorative options including the stunning Hyper Flake Stone range, which combines vibrant colour combinations with exceptional durability. Professional application eliminates common DIY pitfalls and delivers showroom-quality finishes backed by warranty protection. Whether upgrading residential garages, retail showrooms, or commercial facilities, FloorX Industries provides comprehensive solutions from consultation through completion. Discover how durable stylish epoxy coatings can transform your Queensland property with minimal disruption and maximum impact.
Frequently asked questions
How long does decorative epoxy take to cure?
Decorative epoxy typically requires 24-72 hours for initial cure allowing light foot traffic, depending on product formulation and environmental conditions. Full chemical cure and maximum hardness develop over 5-7 days. Temperature and humidity significantly impact cure speed, with warmer conditions accelerating the process and cold or humid environments extending cure times.
Can I apply decorative epoxy myself or should I hire a professional?
DIY application is feasible for homeowners with patience, attention to detail, and willingness to follow instructions precisely. Successful results require proper surface preparation, accurate mixing, and suitable environmental conditions. Professional installation guarantees quality, saves time, provides warranty protection, and delivers superior finishes, especially for large areas or complex decorative effects.
What maintenance is required for decorative epoxy floors?
Regular sweeping or vacuuming removes abrasive grit, while weekly mopping with pH-neutral cleaner maintains appearance. Avoid harsh chemicals, abrasive scrubbers, and steam cleaning that damage the surface. Wipe spills promptly and inspect periodically for damage requiring touch-up. Reapply topcoat sealer every 2-3 years in high-traffic areas to preserve gloss and protection.


